Accessing n8n MCP server#
Connect supported MCP clients to your n8n workflows through n8n's built-in MCP server.
The server allows clients such as Lovable or Claude Desktop to connect securely to an n8n instance. Once connected, these clients can:
- Search within workflows marked as available in MCP
- Retrieve metadata and trigger information for workflows
- Trigger and run exposed workflows
Difference between instance-level MCP access and MCP Server Trigger node#
Instance-level MCP access lets you create one connection per n8n instance, use centralized authentication, and choose which workflows to enable for access. Enabled workflows are easy to find and run without extra setup for each workflow.
In comparison, you configure an MCP Server Trigger node inside a single workflow. This node exposes tools only from that workflow, a useful approach when you want to craft a specific MCP server behavior within one workflow.
Key considerations when using instance-level MCP access#
- It isn't a way to build or edit workflows from an AI client; authoring remains in n8n.
- It doesn't provide blanket exposure to all workflows in your instance. You must enable MCP at the instance level and then enable each workflow individually.
- It's not scoped to each MCP client. Any connected client sees all workflows you’ve enabled for MCP access.
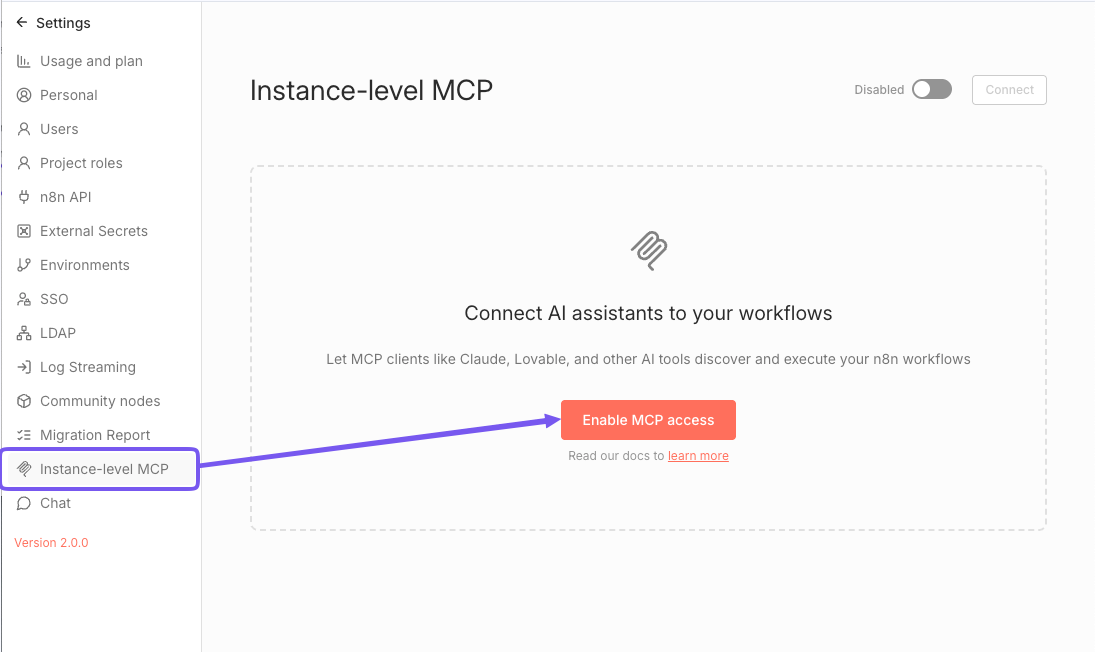
Enabling MCP access#
For Cloud and self-hosted instances#
- Navigate to Settings > Instance-level MCP
- Toggle Enable MCP access (requires instance owner or admin permissions).
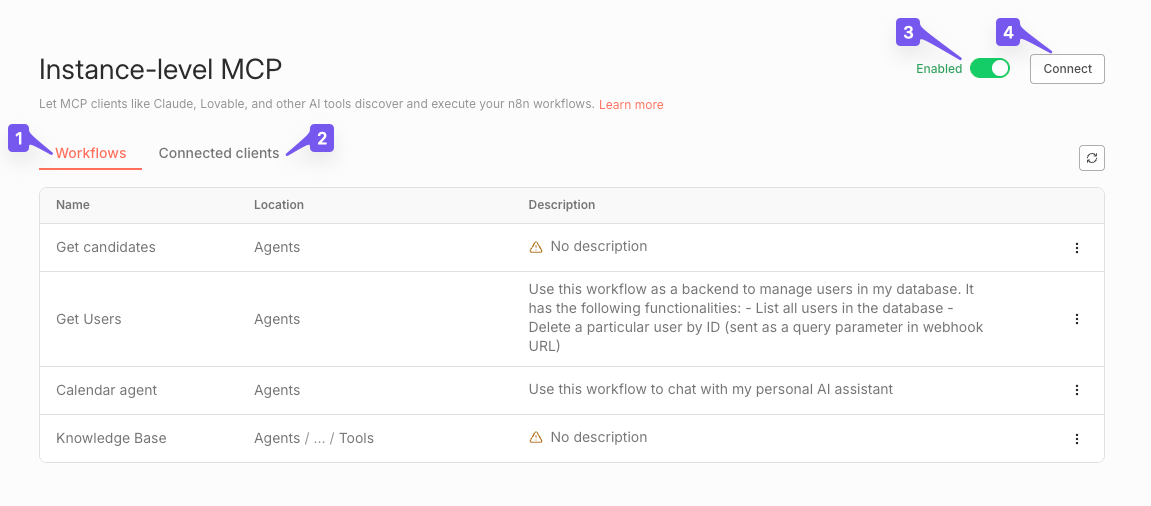
Once enabled, you'll see:
- List of workflows exposed to MCP clients
- List of connected OAuth clients
- Main MCP toggle to enable/disable instance-level access
- Connect button that shows detailed instructions for connecting MCP clients
To disable: Toggle the main MCP toggle off.
For self-hosted: Complete disablement#
To remove the feature entirely, set the environment variable:
N8N_DISABLED_MODULES=mcp
This action removes MCP endpoints and hides all related UI elements.
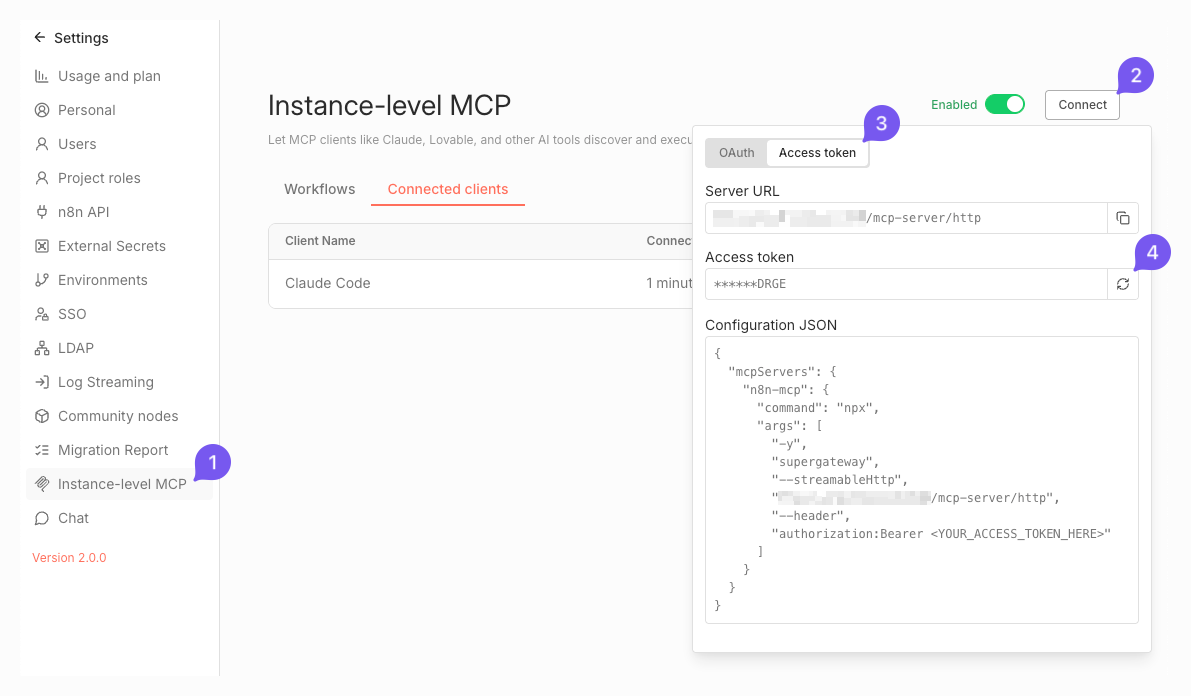
Setting up MCP authentication#
The Connect popup menu provides two authentication options for MCP clients:
- OAuth2
- Access Token
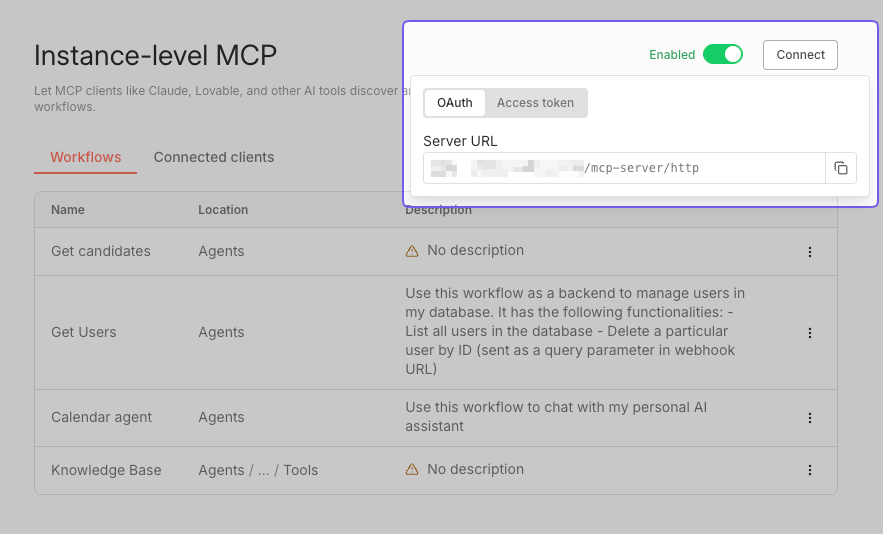
Using OAuth2#
Copy your instance server URL from the OAuth tab and use it to configure your MCP client. After connecting, the client will redirect you to n8n to authorize access.
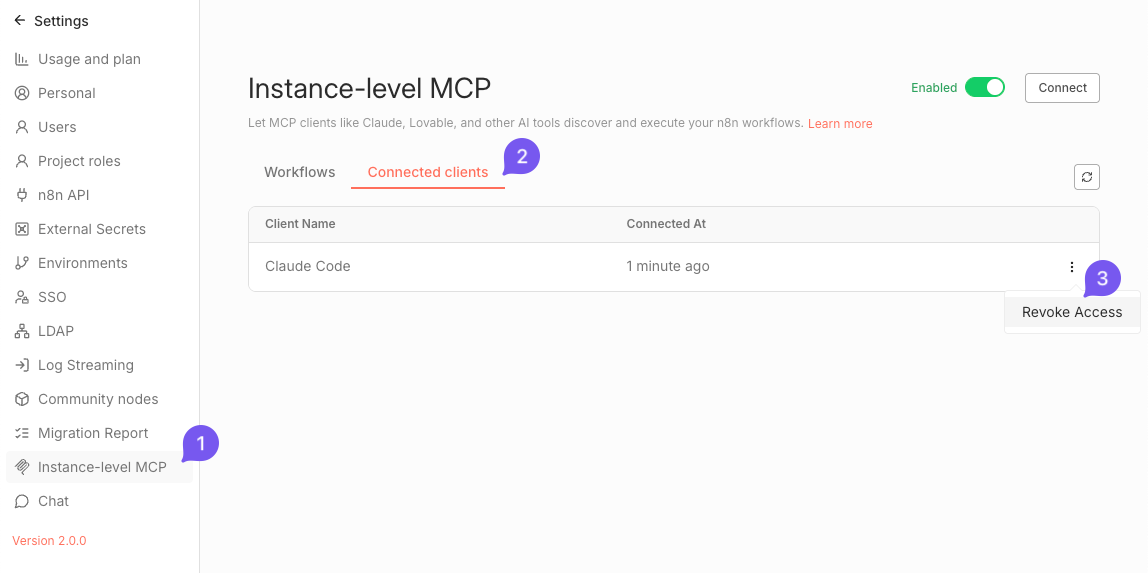
Revoking client access#
To revoke access for connected MCP clients:
- Navigate to Settings > Instance-level MCP.
- Switch to the Connected clients tab. You should see a table of connected OAuth clients.
- Use the action menu in each client's row to revoke access for specific clients.
Using Access Token#
Use your instance server URL and your personal MCP Access Token from the Access Token tab on the Connect menu.
When you first visit the MCP Access page, n8n automatically generates a personal MCP Access Token tied to your user account.
Info
Copy your token right away. On future visits, you'll only see a redacted value and the copy button will be disabled.
Rotating your token#
If you lose your token or need to rotate it:
- Navigate to Settings > Instance-level MCP.
- Open the Connect menu by clicking the Connect button in the top-right corner.
- Switch to the Access Token tab.
-
Generate a new token using the button next to the redacted token value.
n8n revokes the previous token when you generate a new one.
-
Update all connected MCP clients with the new value.
Exposing workflows to MCP clients#
Workflow eligibility#
In order for a workflow to be available to MCP clients, it must meet the following criteria:
- Be published
- Contain one of the following trigger nodes:
- Webhook
- Schedule
- Chat
- Form
By default, no workflows are visible to MCP clients. You must explicitly enable access for each eligible workflow you want to expose.
When evaluating workflow eligibility, n8n will take into account only the published version of the workflow. Workflows that have a supported trigger added to a draft version won't be considered eligible until the version is published.
Info
Once you unpublish a workflow, n8n removes its MCP access. You will have to re-enable access when you publish the workflow again.
Enabling access#
Option 1: From the workflow editor#
- Open the workflow.
- Go to Settings.
- Toggle Available in MCP.
Option 2: From the workflows list#
- Go to Workflows.
- Open the menu on a workflow card.
- Select Enable MCP access.
Managing access#
The Instance-level MCP settings page shows all workflows available to MCP clients. From this list you can:
- Open a workflow, its home project or parent folder directly
- Revoke access using the action menu (or use Disable MCP access from the workflow card menu)
- Update workflow description using the action menu (or use the menu in the workflow editor)
Workflow descriptions#
To help MCP clients identify workflows, you can add free-text descriptions as follows:
-
Option 1: From the Instance-level MCP page
- Navigate to Settings > Instance-level MCP.
- Make sure you are on the Workflows tab.
- Use the action menu in the desired workflow's row and select the Edit description action.
-
Option 2: From the workflow editor
- Open the workflow.
- Click the main workflow menu (
...) in the top-right corner. - Select Edit description.

Executing workflows through MCP clients#
MCP clients can execute eligible workflows on your request. When a client triggers a workflow, it runs as usual in n8n, and you can monitor its execution in the Executions list. Once the execution is complete, the MCP client will retrieve the results.
Providing input data#
MCP clients are typically able to assess what inputs are expected by a workflow. If you have a webhook trigger and If you see a client struggling to determine the right inputs, we recommend you provide this information in the workflow description.
Workflow timeouts#
n8n enforces a 5-minute timeout for workflow executions triggered by MCP clients. If a workflow doesn't finish in time, n8n stops the execution and sends an error to the MCP client, ignoring any timeout you set in the workflow settings for MCP-triggered executions.
Limitations#
- If there are multiple supported triggers in a workflow, MCP clients may only be able to use one (first one) of them to trigger the workflow.
- Executing workflows with multi-step forms or any kind of human-in-the-loop interactions isn't supported.
- Binary input data isn't supported. MCP clients can only provide text-based inputs for your workflows.
Examples#
Connecting Lovable to n8n MCP server#
- Configure MCP Server in Lovable (OAuth).
- Navigate to your workspace Settings > Integrations.
- In the MCP Servers section, find n8n and click Connect.
- Enter your n8n server URL (shown on the MCP Access page).
- Save the connection. If successful, n8n redirects you to authorize Lovable.
- Verify connectivity.
- Once connected, Lovable can query for workflows with MCP access enabled.
- Example: Asking Lovable to build a workflow UI that lists users and allows deleting them.
Connecting Claude Desktop to n8n MCP server#
Using OAuth2#
- Navigate to Settings > Connectors in Claude Desktop.
- Click on Add custom connector.
- Enter the following details:
- Name: n8n MCP
- Remote MCP Server URL: Your n8n base URL (shown on the Instance-level MCP page)
- Save the connector.
- When prompted, authorize Claude Desktop to access your n8n instance.
Using Access Token#
Info
This requires the latest version of Node.js.
Add the following entry to your claude_desktop_config.json file:
1 2 3 4 5 6 7 8 9 10 11 12 13 14 15 | |
Here, replace:
<your-n8n-domain>: Your n8n base URL (shown on the Instance-level MCP page)<YOUR_N8N_MCP_TOKEN>: Your generated token
Connecting Claude Code to n8n MCP server#
Use the following CLI command:
1 2 | |
Alternatively, add the following entry to your claude.json file:
1 2 3 4 5 6 7 8 9 10 11 | |
Here, replace:
<your-n8n-domain>: Your n8n base URL (shown on the Instance-level MCP page)<YOUR_N8N_MCP_TOKEN>: Your generated token
Connecting Codex CLI to n8n MCP server#
Add the following entry to your ~/.codex/config.toml file:
1 2 3 4 5 6 7 8 9 10 | |
Here, replace:
<your-n8n-domain>: Your n8n base URL (shown on the Instance-level MCP page)<YOUR_N8N_MCP_TOKEN>: Your generated token
Connecting Google ADK agent to n8n MCP server#
Here's sample code to create an agent that connects to a remote n8n MCP server:
1 2 3 4 5 6 7 8 9 10 11 12 13 14 15 16 17 18 19 20 21 22 | |
For more details, see Connect ADK agent to n8n.
Troubleshooting#
If you encounter issues connecting MCP clients to your n8n instance, consider the following:
- Ensure that your n8n instance is publicly accessible if you are using cloud-based MCP clients.
- Verify that the MCP access is enabled in n8n settings.
- Check that the workflows you want to access are marked as available in MCP.
- Confirm that the authentication method (OAuth2 or Access Token) is correctly configured in your MCP client.
- Review n8n server logs for any error messages related to MCP connections.
- If you are using desktop MCP clients, make sure you have the latest Node.js version installed.